In order to sew a really nice, well-made men’s vest with all the right pieces (the same method will work for women, but you have to make more adjustments), you need to do the following first:
- Look at some vests from suits you/your guy has or look at the store. Look at the pieces and construction methods.
- Get a pattern and look at what pieces it has (you can make your own pattern from it later) or doesn’t have. What it lacks is telling.
- Read and practice the tutorials on how to make (super easy) welt pockets (also called Reece pockets): click here then scroll down to the section called “welt pocket tutorials”. She doesn’t show you how to add the pocket bag, but we’ll cover that here.
Go on! I’ll be here when you get back.
Oh, you’re back? OK!
What did you notice about the vest(s) from a suit or from the clothing store? I’m sure you saw that there is a front with buttons, buttonholes, maybe some darts, and maybe some pockets. And a back. The whole thing might be lined. There might be a facing at the back neck. There’s a facing along the front edge where the buttons and buttonholes are, which might or might not extend all the way to the side at the hem. There might or might not be facings at the armscyes (armholes).
What did you notice about the pattern? These pictures are from 2 patterns I have, followed by my husband in one of his vests.
-

-
Simplicity Jiffy 9745 vest pattern
-

-
The pattern pieces for the Jiffy pattern (really, there are only 2)
-

-
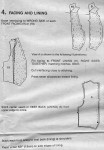
Jiffy instructions part 1
-

-
Jiffy instructions part 2
-

-
Jiffy instructions part 3
-

-
Different variations in the McCall’s 5108 pattern
-

-
McCalls 5108 pattern piece page
-

-
Instructions page 1: notice it’s not a real pocket
-

-
Instructions page 2
-

-
Instructions page 3
-
-
Instructions page 4
-

-
Instructions page 5
-

-
Instructions page 6
-

-
front of vest
-

-
vest front closer up
-

-
the side of the vest
-

-
vest from the back
-

-
print detail
When you don’t have separate facing pieces and interface them, the vest won’t hang right and have strength on the stress points.
Take the front pattern piece and hold it up to yourself or to whomever you’re making the vest for. If the pattern is too long, fold it at the right spot and to shorten it. If it’s too long, cut it and add enough paper to make it long enough. The pattern should have instructions on how to do this if you aren’t familiar with the process. Do the same with the back pattern piece and make sure the side seams match each other. Same with the shoulder seams. Might as well check them, too. And adjust if it’s too wide or narrow.
Find some pattern paper. Not tissue or newsprint or poster board, but pattern paper from the fabric store or butcher paper or thicker white paper or oak tag/manila tag that’s big enough to remake the pattern. Don’t panic! This isn’t complicated and I’m holding your hand. Put the front pattern piece on the pattern paper and weight it down with weights or soup cans or your phone and camera and remote controls or whatever. If you have one of those pattern tracing wheels with the spikes, use that to trace around the sewing lines, not the cutting lines. If you don’t have that kind of tracing wheel, a tracing wheel for transferring marks with tracing paper will work or press really hard with a pencil. This will only work on paper, not that non-woven fiber with the grid or letters/numbers stuff for making patterns. If you’re using that or paper you can see through, put the pattern piece under it and trace it with black pen. At any rate, get the shape of the front onto the new paper. Oh, the front armscye might have too much or too little cut out of it, so hold the pattern up to the recipient and adjust it if necessary. After you have left an indentation with pencil or tracing wheel, go over it in black ink.
Along the shoulder seam and side seam, add 3/8″ seam allowance. Along the other edges, add 1/4″. Use a compass set at 3/8″ or 1/4″ to drag along the curves to duplicate those lines. Now don’t freak out if you’re used to patterns telling you to use 5/8″ everywhere. Take a scrap and try to sew 3/8″ and 1/4″. It’s more accurate. Label it with a style #, the current date, the name of the piece (“front”), and “cut 2”. Notch at the lower side seam where the back belt is supposed to go.
Trace the back pattern piece. If it’s supposed to go along the fold, you might want to scoop a little out at the lower back and add a 3/8″ seam allowance. Add 3/8″ SA at shoulder and side seams and 1/4″ everywhere else. The back armscye might have too much cut out of it. Really, there’s nothing going on back there. All the arm action is in the front. It should be a fairly shallow curve. Label it the same as above except only put “cut 2” if you have a center back seam; otherwise put “cut 1 on fold.” Label all the other pattern pieces this way.
If your vest pattern has a front facing piece, check the length of the seam against the front piece and trace it. If it doesn’t have an extension along the hem to the side seam, trace it from the front you just traced. If there is no front facing, make one by tracing the edge of the front piece from the center front at the shoulder down to the bottom hem and across the hem to the side. Then add a parallel line 2 3/8″ away from the first line and trace the relevant sections of the shoulder and side seams. Trim a bit off the first line (I have to check the pattern books to see where). Make a front armscye facing by tracing the armscye and the side and shoulder seams for 2 3/8″.
The back belt pattern pieces are probably all right, but transfer them to the better paper so they’ll stand up to the rigors of the life of a pattern piece.
The back lining is the same shape as the back shell, so you can use the back pattern piece for both, but only if this isn’t a production pattern. So under your “cut 2” or “cut 1 on fold”, write in GREEN ink the same thing.
The front lining is made like this. Trace your new front piece onto a fresh piece of paper, with GREEN ink. Set the front aside. Line up the front facing piece and trace the edge that doesn’t get attached to the center front of the vest (including the hem extension). Set it aside. Do the same with the front armscye facing piece and set aside. Now set your compass at 3/8″. Trace along the outer side of the lines you just traced from the facings (toward the outside of the pattern piece). Cut along the lines you made with the compass.
I mean, WHEN YOU CUT OUT YOUR PATTERN PIECES, cut OFF the lines! Don’t cut along the outside or down the middle, cut them completely off the pattern piece. (Why? Well, how fat is that line? If you left it there, you’d keep adding to the size of the pattern every time you made a new copy. 1/16″ adds up fast.)
And label the front lining piece with that green pen. You may have noticed that along the CF of the original vest front, there are markings for buttons and buttonholes. If you shortened or lengthened the front, you have to rearrange those marks and add to or subtract from the number of buttons.
If the vest front has any marks for pockets, compare the length of them to the length of the welt and underwelt pieces used in the tutorials. Use what length works for the size of the vest plus an inch on either end. It doesn’t really matter how long as long as you have the inch on each end and enough room to get your hand in to grab your pocket watch. In the particular case of the pattern I made, the welt is 7″ long and 3″ wide, the underwelt is 7″ long and 2 1/2″ wide, and the fusible (interfacing) patterns (done with red pen) are 6 3/4″ x 2 3/4″ and 6 3/4″ x 2 1/4″. Just rectangles. The pocket bag pieces are rectangles the same length but only long enough that they don’t stick out of the vest.
Whew! That wasn’t so hard, was it? 🙂
Now it’s time to go shopping!
Take the pattern with you.
What you need is:
- the shell (main/outer) fabric, enough for the front, the back belt, the welt, the underwelt, and the facings (don’t start with velvet and don’t use fusible interfacing on it, just sew in)
- the lining fabric, enough for the back, back lining, front lining, and the pocket bags
- fusible interfacing, preferably that weird knit/tricot kind (I’ve never had a problem with it but I’ve had problems with the other kind)
- matching thread(s)
- buttons
- vest buckle for the back belt
- muslin to do a mockup first
Come home and wash the fabrics if they’re washable.
Next post will be how to sew it.


